
How to do a DIY oil change and save money
Neglecting oil changes is one of the fastest ways to turn a $40 maintenance task into a $4,000 engine repair. Sludge builds up, metal grinds against metal, and before long your engine is running on borrowed time. The good news: DIY oil changes save you $50 to $100 per service, put quality control in your hands, and give you a chance to catch small problems before they become expensive ones. This guide walks you through every step, from gathering supplies to logging your service record.
Table of Contents
- What you need for a safe, effective oil change
- Step-by-step oil change: From drain to refill
- Avoiding costly mistakes: Common errors and expert tips
- After the change: Checking results and logging service
- What most guides miss: DIY oil changes as a gateway to better car care
- Level up your maintenance with CarJourney
- Frequently asked questions
Key Takeaways
| Point | Details |
|---|---|
| DIY saves money | Changing your oil yourself can save $50-100 per service compared to a shop. |
| Prevent costly mistakes | Proper torque and using the right parts helps avoid expensive damage. |
| Keep detailed records | Log mileage, oil type, and date after each change to maintain your car’s health. |
| Check for leaks | Always inspect under your car and verify oil level after your change to ensure success. |
| Build hands-on confidence | Every oil change makes you more comfortable with car maintenance and spotting issues early. |
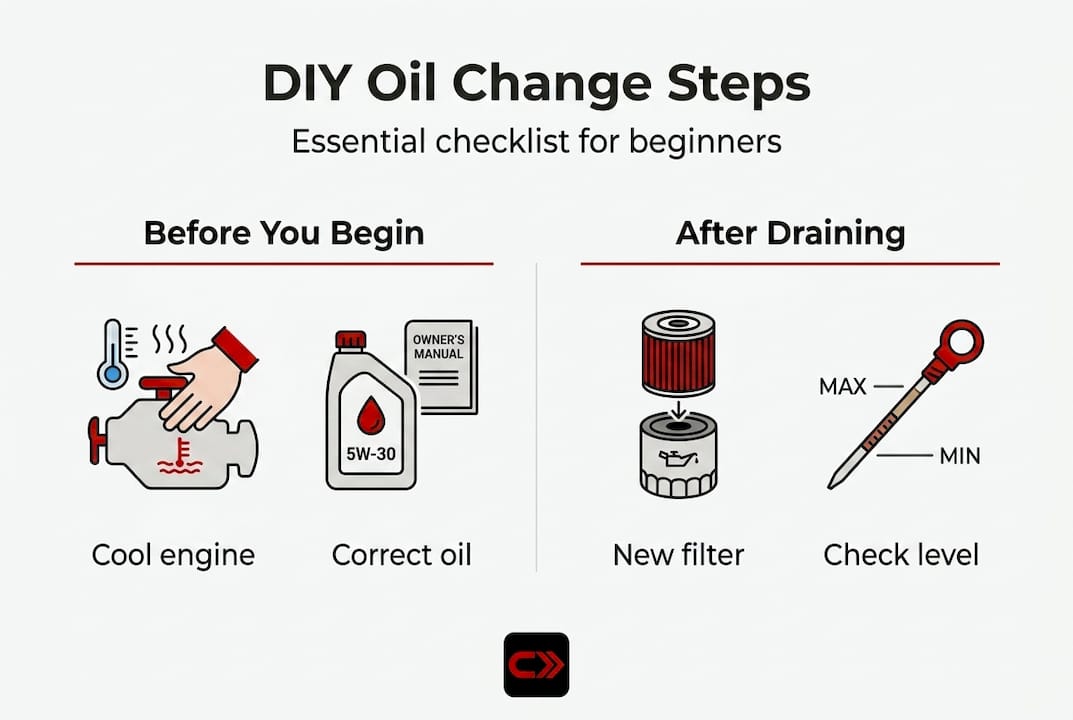
What you need for a safe, effective oil change
Now that you know why a DIY oil change pays off, here’s what you need to get started.
Tools and supplies checklist
Before you touch the drain plug, make sure you have everything on hand. Running back to the auto parts store mid-job is frustrating and wastes time.
- Engine oil (correct viscosity and quantity for your vehicle)
- New oil filter (spin-on or cartridge, depending on your engine)
- Drain plug crush washer (always use a new one, never reuse the old one)
- Oil drain pan (large enough to hold your engine’s full capacity)
- Oil filter wrench (spin-on and cartridge filters require different wrench types)
- Drain plug socket or wrench
- Funnel
- Nitrile gloves and shop rags
- Vehicle ramps or jack stands
“Cartridge vs spin-on filters require different wrenches; low-clearance vehicles need ramps or jack stands and you should never rely on a jack alone; hot oil burns, so wait at least 10 minutes after running the engine before draining.”
Know your oil type before you buy
Check your owner’s manual for the recommended oil viscosity, such as 5W-30 or 0W-20, and the total capacity in quarts. Using the wrong viscosity is a mistake that’s easy to avoid and costly to ignore. Many auto parts stores have lookup tools, and you can also use a maintenance log essentials resource to keep that information stored and ready for next time.

Pro Tip: Buy an extra quart of oil beyond your engine’s capacity. You’ll use it to top off after the initial startup check, and having it on hand prevents a last-minute scramble.
Safety first
Allow the engine to cool for at least 10 minutes after a short warm-up run. Warm oil flows faster and drains more completely than cold oil, but scalding hot oil straight from a fully warmed engine will burn you badly. Position your vehicle on a flat, solid surface. If you need to raise the car, use ramps or jack stands rated for your vehicle’s weight. Never work under a car supported only by a floor jack.
| Vehicle type | Lifting method | Notes |
|---|---|---|
| Truck or SUV | Usually accessible without lifting | Verify clearance first |
| Standard sedan | Ramps or jack stands | Confirm rated weight capacity |
| Low-clearance sports car | Jack stands required | Use pinch weld adapters if needed |
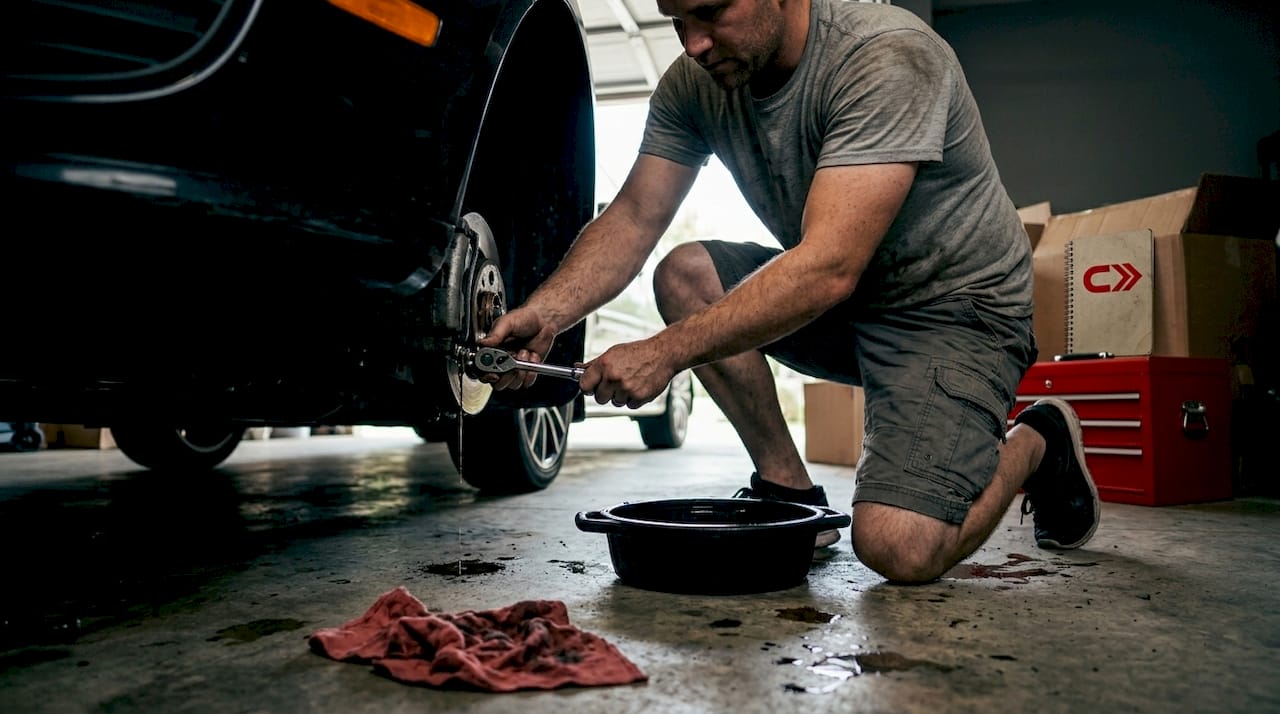
Step-by-step oil change: From drain to refill
With your supplies ready, follow these steps for a successful oil change.
The process
- Warm the engine briefly. Run it for two to three minutes, then shut it off and wait 10 minutes. Warm oil drains faster and more completely.
- Raise the vehicle safely. Drive onto ramps or lift with a floor jack and secure on stands before getting underneath.
- Locate the drain plug and position your pan. The drain plug is at the lowest point of the oil pan. Place your drain pan slightly rearward of the plug because oil arcs outward as it exits and will miss a pan placed directly below.
- Remove the drain plug. Use the correct socket and turn counterclockwise. Keep your hand ready to pull back as oil begins to flow.
- Let it drain fully. Give it at least five minutes. Rushing this step leaves dirty oil in the pan.
- Replace the crush washer and reinstall the plug. Install a fresh crush washer every time. Torque the plug to your vehicle’s specification, typically 25 to 30 foot-pounds for most passenger cars.
- Remove the old filter. Use your filter wrench and have a rag ready since residual oil will drip.
- Prep and install the new filter. Dip your finger in fresh oil and coat the new filter’s rubber gasket. This ensures a proper seal and makes future removal easier. Hand-tighten the filter 3/4 turn past the point where the gasket contacts the engine. Never use a wrench to tighten a spin-on filter.
- Refill with fresh oil. Use a funnel, pour in the recommended amount, and replace the oil cap securely.
- Start the engine and check for leaks. Let it idle for 60 seconds. Watch the oil pressure warning light, it should go out within a few seconds. Check around the drain plug and filter for any seeping oil.
- Shut off, wait, and check the dipstick. Let the engine sit for two minutes so oil settles back into the pan, then pull the dipstick and confirm the level is in the safe range.
Pro Tip: While you’re under the car, take 60 extra seconds to check your oil change details like brake lines, CV boots, and any visible fluid leaks. You’re already down there.
| Step | Common issue | Fix |
|---|---|---|
| Drain plug removal | Rounded bolt head | Use a proper fitting socket, not an adjustable wrench |
| Filter removal | Stuck filter | Use a strap wrench, not a screwdriver through the body |
| Refill | Overfilling | Add oil in small increments and check the dipstick often |
| Startup check | Oil light stays on | Shut off immediately and recheck plug and filter seating |
Once you’re done, track maintenance records with the date, mileage, oil brand, viscosity, and filter part number. Future-you will be grateful.
Avoiding costly mistakes: Common errors and expert tips
Even with step-by-step instructions, some easy-to-miss mistakes can undermine your DIY oil change.
The most expensive mistakes
Over-tightening the drain plug is the number one cause of stripped threads. Stripped threads in an aluminum oil pan can cost $300 to $800 to repair, sometimes requiring a full pan replacement. Snug is enough. Use a torque wrench if you want certainty. Over-tightening the plug or filter is far more common than under-tightening, and the consequences are far worse.
Reusing the old crush washer is a small oversight with big consequences. The washer deforms on first use to create a metal-to-metal seal. Reusing it almost guarantees a slow leak that can go unnoticed until your oil level drops dangerously low.
Using the wrong oil viscosity is surprisingly common, especially when buying oil on sale without checking specs first. A 10W-40 in an engine that calls for 0W-20 will not flow properly in cold weather and can cause wear during cold starts.
Overfilling the oil is just as harmful as running low. Excess oil gets whipped into foam by the crankshaft, which loses its lubricating properties. Always fill to the recommended mark on the dipstick, not above it.
- Never skip the post-change leak check
- Always reset the oil life monitor after completing the change
- Cross-reference your typical oil change savings to see how fast DIY pays for your tools
- Double-check that the old filter gasket didn’t stick to the engine block when you removed the old filter
Pro Tip: Take a photo of your dipstick reading right after filling and again after the first startup check. It takes five seconds and gives you a quick visual reference if you’re ever unsure later.
After the change: Checking results and logging service
Once you’ve changed your oil, a few final checks and record-keeping will make sure your hard work pays off.
Post-change checklist
- Check for leaks immediately after startup. Any drip from the plug or filter area means something needs attention before you drive.
- Verify oil level after a two-minute cooldown. The dipstick reading right after shutdown can be misleading since oil hasn’t fully settled.
- Watch for drips in your parking spot over the first two to three drives. A small spot of fresh oil is a sign to recheck fittings.
- Reset the oil life monitor. The process varies by make and model, but it’s usually done through the instrument cluster menu. Skipping this step means your car’s reminder system is still counting down from the old change.
Proper DIY maintenance prevents engine wear and sludge buildup over time, which is exactly the kind of long-term protection that keeps repair bills low.
Pro Tip: Set your next oil change reminder right now, before you forget. Whether it’s a calendar alert or an app, scheduling it immediately means you won’t be caught off guard.
- Log the date, mileage, oil brand, viscosity, and filter brand
- Note any observations from under the car, such as fluid drips or worn boots
- Store the record digitally using a tool like an auto maintenance tracker so it’s searchable and accessible
An oil change tracker app takes the guesswork out of knowing when you’re due and keeps your full service history in one place.
What most guides miss: DIY oil changes as a gateway to better car care
Most how-to guides treat an oil change as a standalone task. We see it differently. The first time you get under your car with a wrench, something shifts. You stop thinking of your vehicle as a black box and start seeing it as a system you can understand and manage.
That shift matters. DIY oil changers tend to notice things: a slight smell of coolant, a CV boot that’s cracked and weeping grease, brake lines that look older than they should. None of those discoveries happen in a quick-lube bay where the tech is working on four cars at once. They happen when you’re the one lying on the ground with a flashlight.
Some enthusiasts take this further by sending used oil samples to a lab for analysis. Oil analysis can detect
wear metals and contamination levels that tell you whether your engine is healthy or quietly developing a problem. It’s a niche practice, but it illustrates a broader point: once you’re engaged with your car’s maintenance, you start making smarter, more personalized decisions rather than following a generic schedule.Better record-keeping follows naturally. When you’re the one buying the filter and pouring the oil, you remember to write it down. That history becomes genuinely useful when diagnosing an issue or selling the car. Buyers trust documented maintenance. Mechanics trust it too.
Start with oil changes. Build the habit. Explore custom maintenance schedules that fit your actual driving conditions rather than a one-size-fits-all mileage interval. The confidence you build doing simple jobs makes every future repair feel less intimidating.
Level up your maintenance with CarJourney
Ready to make tracking your maintenance just as easy as performing it?
You’ve just done the hard part. Now keep that momentum going with a system that works as hard as you do.
CarJourney logs every oil change, sets reminders for your next service, and uses AI to answer questions about your specific vehicle. No more digging through glove box receipts or guessing when you last changed your filter. Our team at Blue Shed Digital built CarJourney because we were tired of the same scattered, generic tools that ignore your actual build. Whether you’re maintaining one daily driver or tracking a full garage, CarJourney keeps your entire service history organized, searchable, and smart.
Frequently asked questions
How often should I change my car’s oil?
Follow your owner’s manual or dashboard oil life monitor, typically every 5,000 to 7,500 miles for modern engines using full synthetic oil.
What’s the most common DIY oil change mistake?
Over-tightening the drain plug or oil filter is the most frequent error, and it can strip threads and cause leaks that are expensive to fix.
Can I change my oil without ramps or jack stands?
Only if you can safely reach the drain plug and filter from ground level. For low-clearance vehicles, use ramps or jack stands rated for your vehicle’s weight and never work under a car supported only by a floor jack.
Do I have to reset the oil life monitor after changing oil?
Yes. Forgetting to reset the monitor means your car’s maintenance reminder will be based on the old change, not the fresh one.
What if I spot a leak after the change?
Wipe the area clean, run the engine briefly, and check the plug and filter tightness along with the crush washer seating. A persistent leak means something needs to be reseated or replaced before you drive.