
What Is Brake Bleeding? A DIY Mechanic's Guide
What Is Brake Bleeding? A DIY Mechanic’s Guide
Brake bleeding is defined as the process of removing trapped air bubbles from a vehicle’s hydraulic brake lines to restore firm pedal feel and full stopping power. Air compresses under pressure while brake fluid does not, so even a small pocket of air in the system reduces braking force transmitted from the master cylinder to the calipers. The result is a spongy, unresponsive pedal that can fail you at exactly the wrong moment. For any car owner or DIY mechanic working with DOT 3 or DOT 4 fluid, box-end wrenches, and clear plastic tubing, understanding this procedure is non-negotiable for vehicle safety in 2026.
What is brake bleeding and how does the process work?
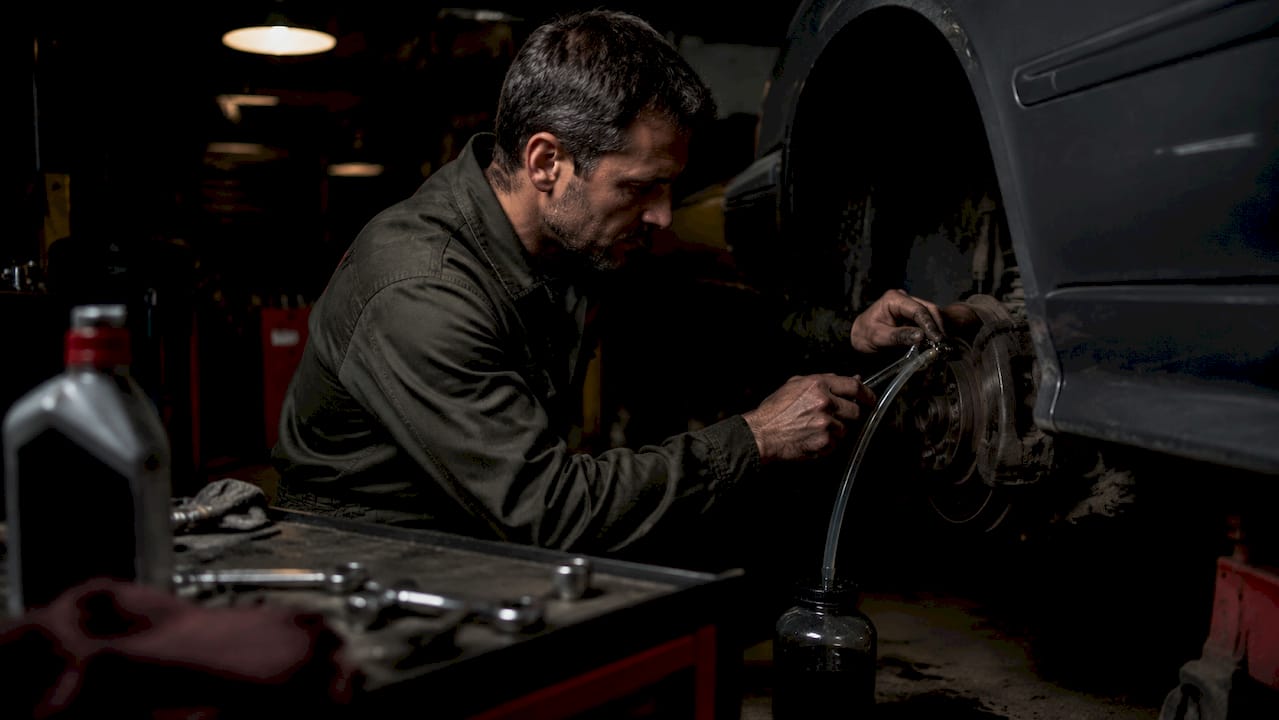
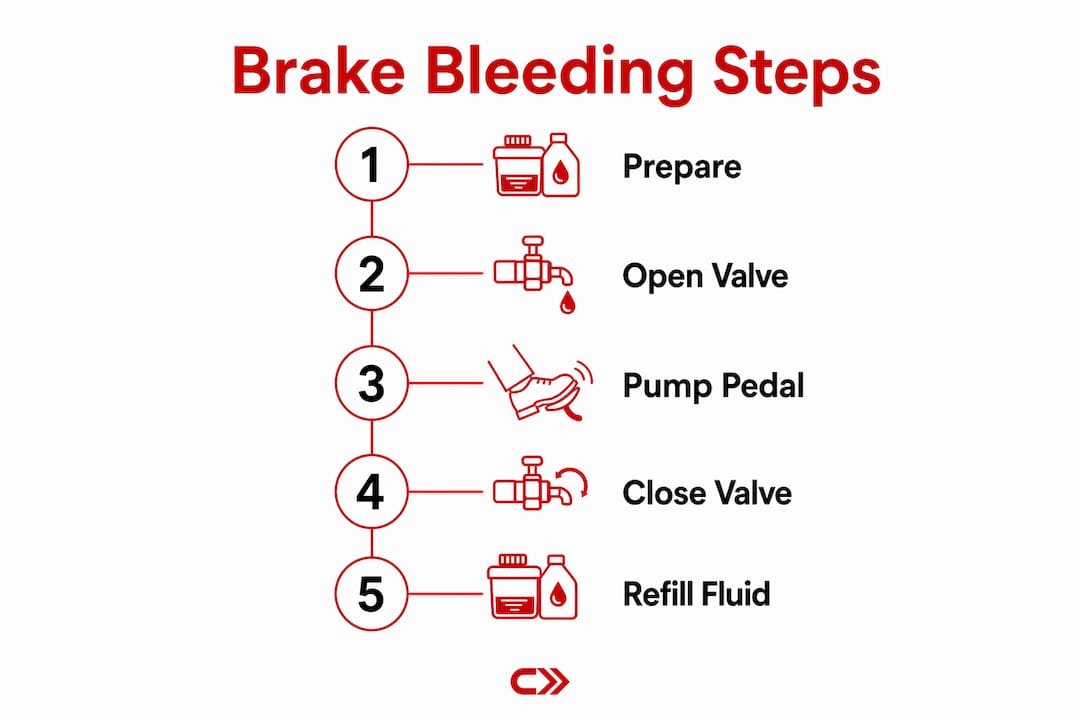
Brake bleeding works by opening a bleeder screw at each wheel caliper or wheel cylinder, allowing fluid and trapped air to exit the system while fresh fluid is pushed through from the master cylinder reservoir. The standard bleeding sequence moves from the wheel farthest from the master cylinder to the nearest. On most front-engine vehicles, that means starting at the passenger rear, then the driver rear, then the passenger front, and finishing at the driver front. Always verify this sequence in your vehicle’s service manual since some manufacturers specify a different order.
There are four main bleeding techniques, and each suits a different situation.
- Gravity bleeding is the simplest method. Open the bleeder screw and let fluid drip out on its own. Gravity bleeding takes 15 to 30 minutes per wheel, making it the slowest option but also the least likely to introduce new air if done carefully.
- Manual two-person bleeding uses one person pumping the brake pedal while another opens and closes the bleeder screw in sequence. This is the most common DIY method and moves fluid faster than gravity alone.
- Vacuum bleeding uses a hand-held vacuum pump attached to the bleeder screw to draw fluid through the system. It works well for solo mechanics but can pull air past the bleeder screw threads if the screw is worn.
- Pressure bleeding pushes fluid from a pressurized reservoir attached to the master cylinder cap. Shops use this method most often because it is fast and consistent.
Pro Tip: Keep the master cylinder reservoir at least half full throughout the entire process. If it runs dry, air re-enters the system from the top and you have to start over from scratch.
What tools and materials do you need to bleed brakes at home?
Getting the right tools before you start separates a clean job from a frustrating one. The good news is that DIY bleeding costs roughly $0 to $50 depending on what you already own, making it one of the most affordable brake maintenance tasks you can do yourself.
Here is what you need:
- Six-point box-end wrench in the correct size for your bleeder screws (typically 8mm or 10mm). Never use a crescent wrench. The rounded jaws of an adjustable wrench strip the soft metal of bleeder screws almost immediately, turning a $5 screw into a $200 caliper replacement.
- Clear plastic tubing that fits snugly over the bleeder screw nipple. Transparency matters here. You watch the fluid flowing through the tube to spot air bubbles and confirm when the line runs clean.
- A catch container to collect old fluid. Brake fluid damages paint, so keep it contained and dispose of it properly at a recycling center.
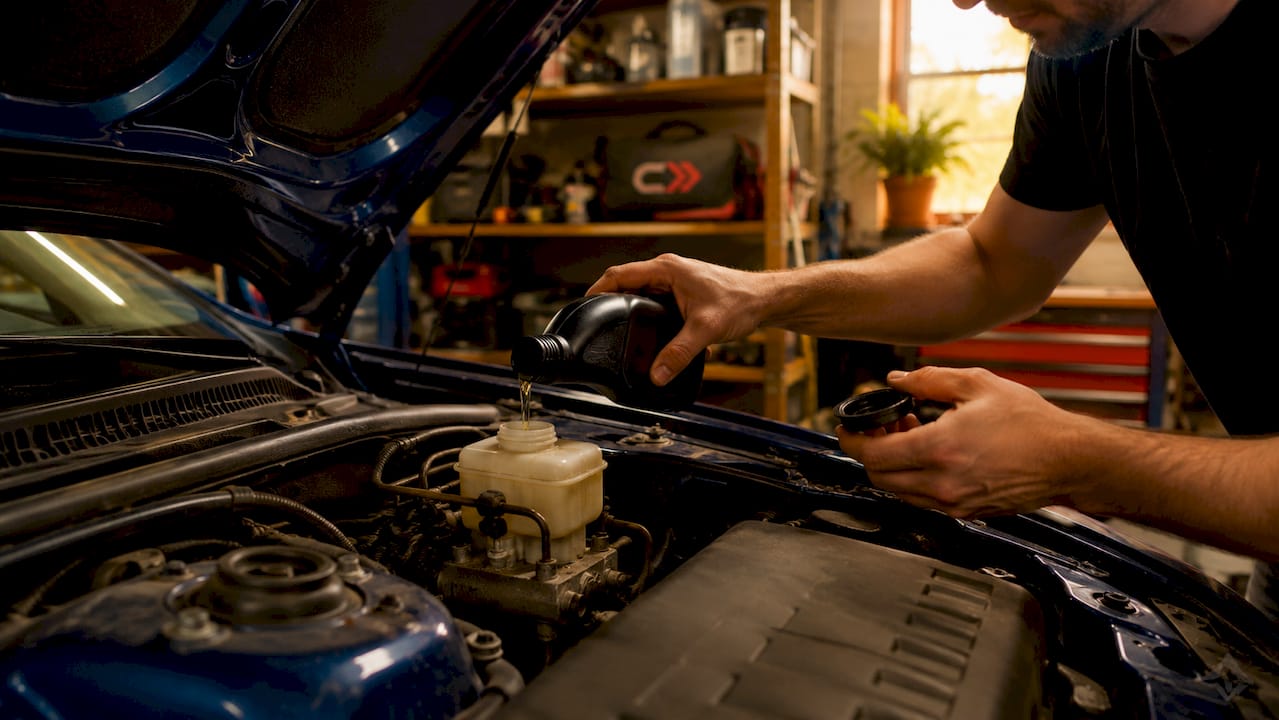
- Fresh brake fluid matching your vehicle’s OEM specification. Most passenger cars use DOT 3 or DOT 4. Do not mix types unless your manufacturer explicitly permits it.
- Penetrating oil such as PB Blaster or Kroil, applied to the bleeder screws the day before you plan to work.
Pro Tip: Apply penetrating oil 24 hours before bleeding. Seized bleeder screws are the number one reason a simple brake job turns into a caliper replacement. A little patience the night before saves you significant money and frustration.
One more note on fluid: brake fluid is hygroscopic, meaning it actively absorbs moisture from the air. Never use fluid from a container that has been open for more than a few weeks. Cap bottles immediately after pouring and discard any leftover fluid from an opened container rather than saving it for next time.
Troubleshooting common brake bleeding problems
Even a careful bleed can leave you with a pedal that still feels soft. Understanding why helps you fix the problem rather than repeat the same steps and expect a different result.
- Spongy pedal after bleeding usually means air is still in the system. The most overlooked location is the ABS hydraulic control unit. Air trapped in ABS modules cannot be removed by manual bleeding alone. You need a scan tool to actuate the ABS pump valves and cycle the trapped air out. This is where many DIY bleeds fall short on modern vehicles.
- Bleeder screw that won’t open is almost always a rust problem. Forcing it risks snapping the screw inside the caliper. If penetrating oil and a six-point wrench do not free it, stop and take the vehicle to a shop. Extracting a broken bleeder screw requires a drill and tap set that most home mechanics do not own.
- Fluid that looks dark brown or black at the bleeder screw indicates severely degraded fluid throughout the system. Bleeding alone will not fix this. You need a full fluid flush.
- Air that keeps returning after multiple bleeds often traces back to worn brake pads. Brake pads wearing down causes the fluid level in the master cylinder reservoir to drop, which can suck air into the system. Check pad thickness and top off the reservoir as part of your regular inspection routine.
Safety experts are clear: if you are unfamiliar with the bleeding procedure or your vehicle has a complex ABS system, professional brake service is the right call. Brakes are not the system to experiment on when you are uncertain.
For a deeper look at documenting your brake work correctly, the CarJourney guide on logging brake jobs walks through what to record and why it matters for future troubleshooting.
Brake bleeding vs. fluid flush: when to do each
These two procedures are related but not the same, and confusing them leads to incomplete maintenance.
Brake bleeding removes air from the hydraulic lines. It restores pedal feel and braking response. It does not replace the old fluid already circulating through the system. Think of it as fixing a specific problem rather than performing general upkeep.
A full fluid flush replaces all the old brake fluid with fresh fluid. Bleeding removes air temporarily while a flush addresses long-term reliability by eliminating degraded fluid throughout the entire system. Most manufacturers recommend a flush every two to three years regardless of mileage, though high-performance driving shortens that interval.
| Procedure | What it does | When to do it |
|---|---|---|
| Brake bleeding | Removes trapped air from lines | Spongy pedal, after brake component replacement, or any time air enters the system |
| Fluid flush | Replaces all brake fluid in the system | Every 2 to 3 years, or when fluid appears dark and contaminated |
| Both combined | Purges air and replaces degraded fluid | After major brake work, or as part of a scheduled maintenance interval |
The hygroscopic nature of brake fluid is the reason flushing matters beyond just bleeding. Moisture absorbed into the fluid lowers its boiling point. Under hard braking, overheated fluid can vaporize inside the lines, creating air pockets on the spot. This condition is called brake fade, and it is dangerous. Regular fluid maintenance prevents it. Combining a bleed with a flush during the same service visit is the most efficient way to keep the system in top condition. You can find a broader framework for scheduling this kind of work in the CarJourney post on preventive maintenance tips that every car owner should know.
Key takeaways
Brake bleeding is the single most direct fix for a spongy pedal, but it works best when paired with fresh fluid, the right tools, and an honest assessment of your ABS system’s complexity.
| Point | Details |
|---|---|
| Definition matters | Brake bleeding removes air from hydraulic lines; it does not replace degraded fluid. |
| Sequence is critical | Start at the wheel farthest from the master cylinder and work inward to purge air completely. |
| ABS adds complexity | Air trapped in ABS modules requires a scan tool to remove, not just manual bleeding. |
| Tool selection protects hardware | Use a six-point box-end wrench and apply penetrating oil 24 hours before to protect bleeder screws. |
| Bleeding and flushing serve different purposes | Combine both procedures every two to three years for full brake system reliability. |
Why I think most DIYers underestimate this job
I have seen a lot of brake bleeds go sideways, and the pattern is almost always the same. Someone buys the right fluid, grabs a wrench, and skips the part where they actually read their vehicle’s service manual. They bleed in the wrong sequence, run the reservoir dry once, and end up with a pedal that feels worse than when they started. Then they assume the procedure does not work.
The truth is that DIY brake bleeding is genuinely accessible, but it rewards preparation more than almost any other maintenance task. The penetrating oil step is not optional on a vehicle with more than 50,000 miles. The sequence is not a suggestion. And the ABS caveat is something every modern car owner needs to understand before they start, not after they have already spent two hours under the car.
What I respect about this job is that it teaches you something real about how your brake system works. Once you have watched air bubbles clear from a piece of clear tubing and felt the pedal firm up under your foot, you understand the hydraulic system in a way no article can fully replicate. That tactile knowledge makes you a better mechanic across the board.
My honest advice: if your vehicle is newer than 2010 and has ABS, do a manual bleed first and test the pedal. If it is still soft, do not keep bleeding the same corners. Get a scan tool or take it to a shop that has one. Knowing when to stop is as important as knowing how to start.
— Chally
Keep your brake maintenance organized with CarJourney
Brake bleeding is one of those jobs that is easy to forget until your pedal tells you otherwise. CarJourney, built by the team at Blue Shed Digital in Virginia, gives DIY mechanics and car enthusiasts one place to log every brake service, set maintenance reminders, and get AI-powered answers about their specific vehicle’s brake specs and bleeding sequence. No more guessing when you last changed your fluid or which DOT rating your car requires. Track your vehicle maintenance history in CarJourney and stay ahead of brake issues before they become safety problems.
FAQ
What does brake bleeding actually do?
Brake bleeding removes trapped air bubbles from the hydraulic brake lines. Air compresses under pressure while brake fluid does not, so removing it restores firm pedal feel and full braking force.
How often should you bleed your brakes?
Bleed your brakes any time you notice a spongy pedal, after replacing brake components, or whenever air enters the system. Pair bleeding with a full fluid flush every two to three years for long-term reliability.
Can you bleed brakes by yourself?
Yes. Gravity bleeding and vacuum bleeding both work for solo mechanics. Gravity bleeding requires only a wrench, clear tubing, and a catch container, though it takes 15 to 30 minutes per wheel.
Why is my pedal still soft after bleeding?
A pedal that remains soft after a manual bleed often means air is trapped in the ABS hydraulic control unit. Removing it requires a scan tool to cycle the ABS pump valves, which standard manual bleeding cannot reach.
What brake fluid should I use when bleeding?
Use the fluid type specified in your vehicle’s owner manual, typically DOT 3 or DOT 4. Always use fluid from a freshly opened, sealed container since brake fluid absorbs moisture from the air and degrades quickly once opened.